Guide to Filing KRA ITAX Returns
It is mandetory to file your tax returns each year between January and the last date of June. Failure to file your yearly returns attracts a penalty of Ksh. 20,000 which you don’t wish to be applied no you. This article gives step by step guidelines to follow.
This practice is mandatory for everyone holding a KRA personal PIN number and you are required to file your returns regardless of your employment status. Therefore the assumption you are not supposed to file your returns if you are not employed is wrong and this will make you a victim of the penalty if you fail to file your tax returns. But for non-employed individuals who have not earned income for a period of one year, file nil returns
How to file nil returns
1. Log in to itax portal
2. Enter your KRA pin, click continue to enter your password
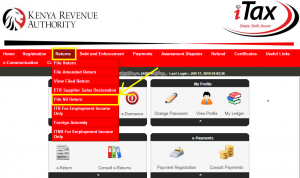
3. Once logged in click on the returns Menu
4. Select File Nil Returns option.
5. Under tax obligation select income tax resident
6. Enter the return period(the first date of January of last year to the last date of the last month of the same year)
7. Click submit.
8. The system generates an acknowledgement receipt, then print it for future reference
How to file P9 returns
P9 is an accumulative earnings of an individual plus benefits and allowances earned over a period of up to 1 year. It also indicates the tax deducted and the details of your employer.
Read Also: How to apply for Police Clearance Certificate
1. Log in to the KRA itax portal
2. Enter your KRA PIN number,password and answer the arithmetic question to log in
3. Click on the returns Menu or the ’e returns’ icon and select File Returns
4. Select the tax type for example ‘Original’ then enter the taxpayers PIN and select the tax obligation applicable to you and click ‘next’
5. Click on the returns form convenient to you and download it( I recommend excel sheet)
6. Enable editing and macros to be able to edit, validate and zip your file.
7. Fill in the necessary fields with the help of your P9 form then press next to proceed to more field until you fill the last one.
8. After filling the form validate it
9. The form will be saved in a zipped form. Note the location where your file has been saved.
10. Close the window and log into the itax system again.
11. This time round don’t download the excel sheet but instead press on the browse button below it then upload your filled zipped form.
12. Once you upload your zipped file submit it.
13. Download an e-returns acknowledgement receipt generated and keep it for future reference
Read Also: How to apply for HELB compliance certificate